1. 텍스트 리소스 편집
strings.xml에는 string을 넣는다.
<string name = "○○○○○"> ☆☆☆☆☆☆</string>
○○○○○ -> app_name, title1, author1, body1
☆☆☆☆ -> 쓸 내용들 " " , ' ' 없이
app_name -> 어플리케이션 라벨과 액티비티 라벨을 바꾼다.
2. 화면 설계
activity_main.xml
리니어 레이아웃을 화면의 가로와 세로 전체로 할당
화면에 출력할 텍스트뷰들을 수직으로 배치
3개의 TextVeiw를 할당하고
strings.xml에 정의된 title1, author1, body1를 설정
각 텍스트뷰는 글자 크기, 출력 위치, 글자 색, 글자 배경 색을 지정
android:layout_width="match_parent"
android:layout_height="match_parent"
android:orientation="vertical"
android:paddingTop="20dp"
android:paddingBottom="20dp"
android:paddingLeft="20dp"
android:paddingRight="20dp"
LinearLayout 클래스의
layout_width와 layout_height의 속성값에 따라 뷰의 크기가 변함
그 크기는 뷰를 담고 있는 컨테이너와 뷰 내의 콘텐츠에 따라 다름.
match_parent -> 레이아웃은 스마트폰 화면의 가로 세로 전체를 채움
wrap_content -> LinearLayout 내의 컨텐츠 크기만큼 됨
android:orientation
화면 레이아웃의 방향을 의미
행에 대해서는 vertical(수직), 열에 대해서는 horizontal(수평)
<TextView /> : TextView 클래스
<TextView
    android:layout_width="match_parent"
    android:layout_height="wrap_content"
    android:text="@string/title1"
    android:textSize="18sp"
    android:gravity="center"
    android:textStyle="bold"
    android:textColor="#61380B"
    android:background="#3061380B" />

<TextView
    android:layout_width="match_parent"
    android:layout_height="wrap_content"
    android:text="@string/author1"
    android:textSize="15sp"
    android:textColor="#22741C"/>

<TextView
    android:layout_width="match_parent"
    android:layout_height="wrap_content"
    android:text="@string/body1"
    android:singleLine="true"
    android:ellipsize="marquee"
    android:textSize="15sp" />
android:text
TextView가 출력하는 문자
속성값은 문자열을 하드 코딩하거나 string 리소스를 정의
android:text='@strings/○○○○"
res/values/strings.xml 파일에 정의되어있는 string 자원 사용
android:textColor
android:textSize
사용가능한 사이즈는 px, dp, sp, in, mm
텍스트의 경우는 sp 사용 추천
android:textStyle
문자의 스타일을 지정
'|' 를 이용해 여러 값을 설정 가능 ("bold | italic")
android:gravity
뷰 내의 콘텐츠(텍스트)의 위치
top, bottom, left, right, center_vertical, center_horizontal, center
android:singleLine
true 또는 false 값을 가진다!
true인 경우 문장을 여러줄에 표시하지 않고 한 줄에
스크롤 되게 표시함
android:ellipsize
문자가 정해진 범위를 벗어날 때 문장이 잘리는 것 대신에 효과를 줌
none : 없음
start : 문장 앞을 '...' 표시
middle : 문장 중간을 '...' 표시
end : 문장 뒤를 '...' 표시
marquee : 문장이 수평으로 흘러감 (TextView 인식 필요)
view 클래스
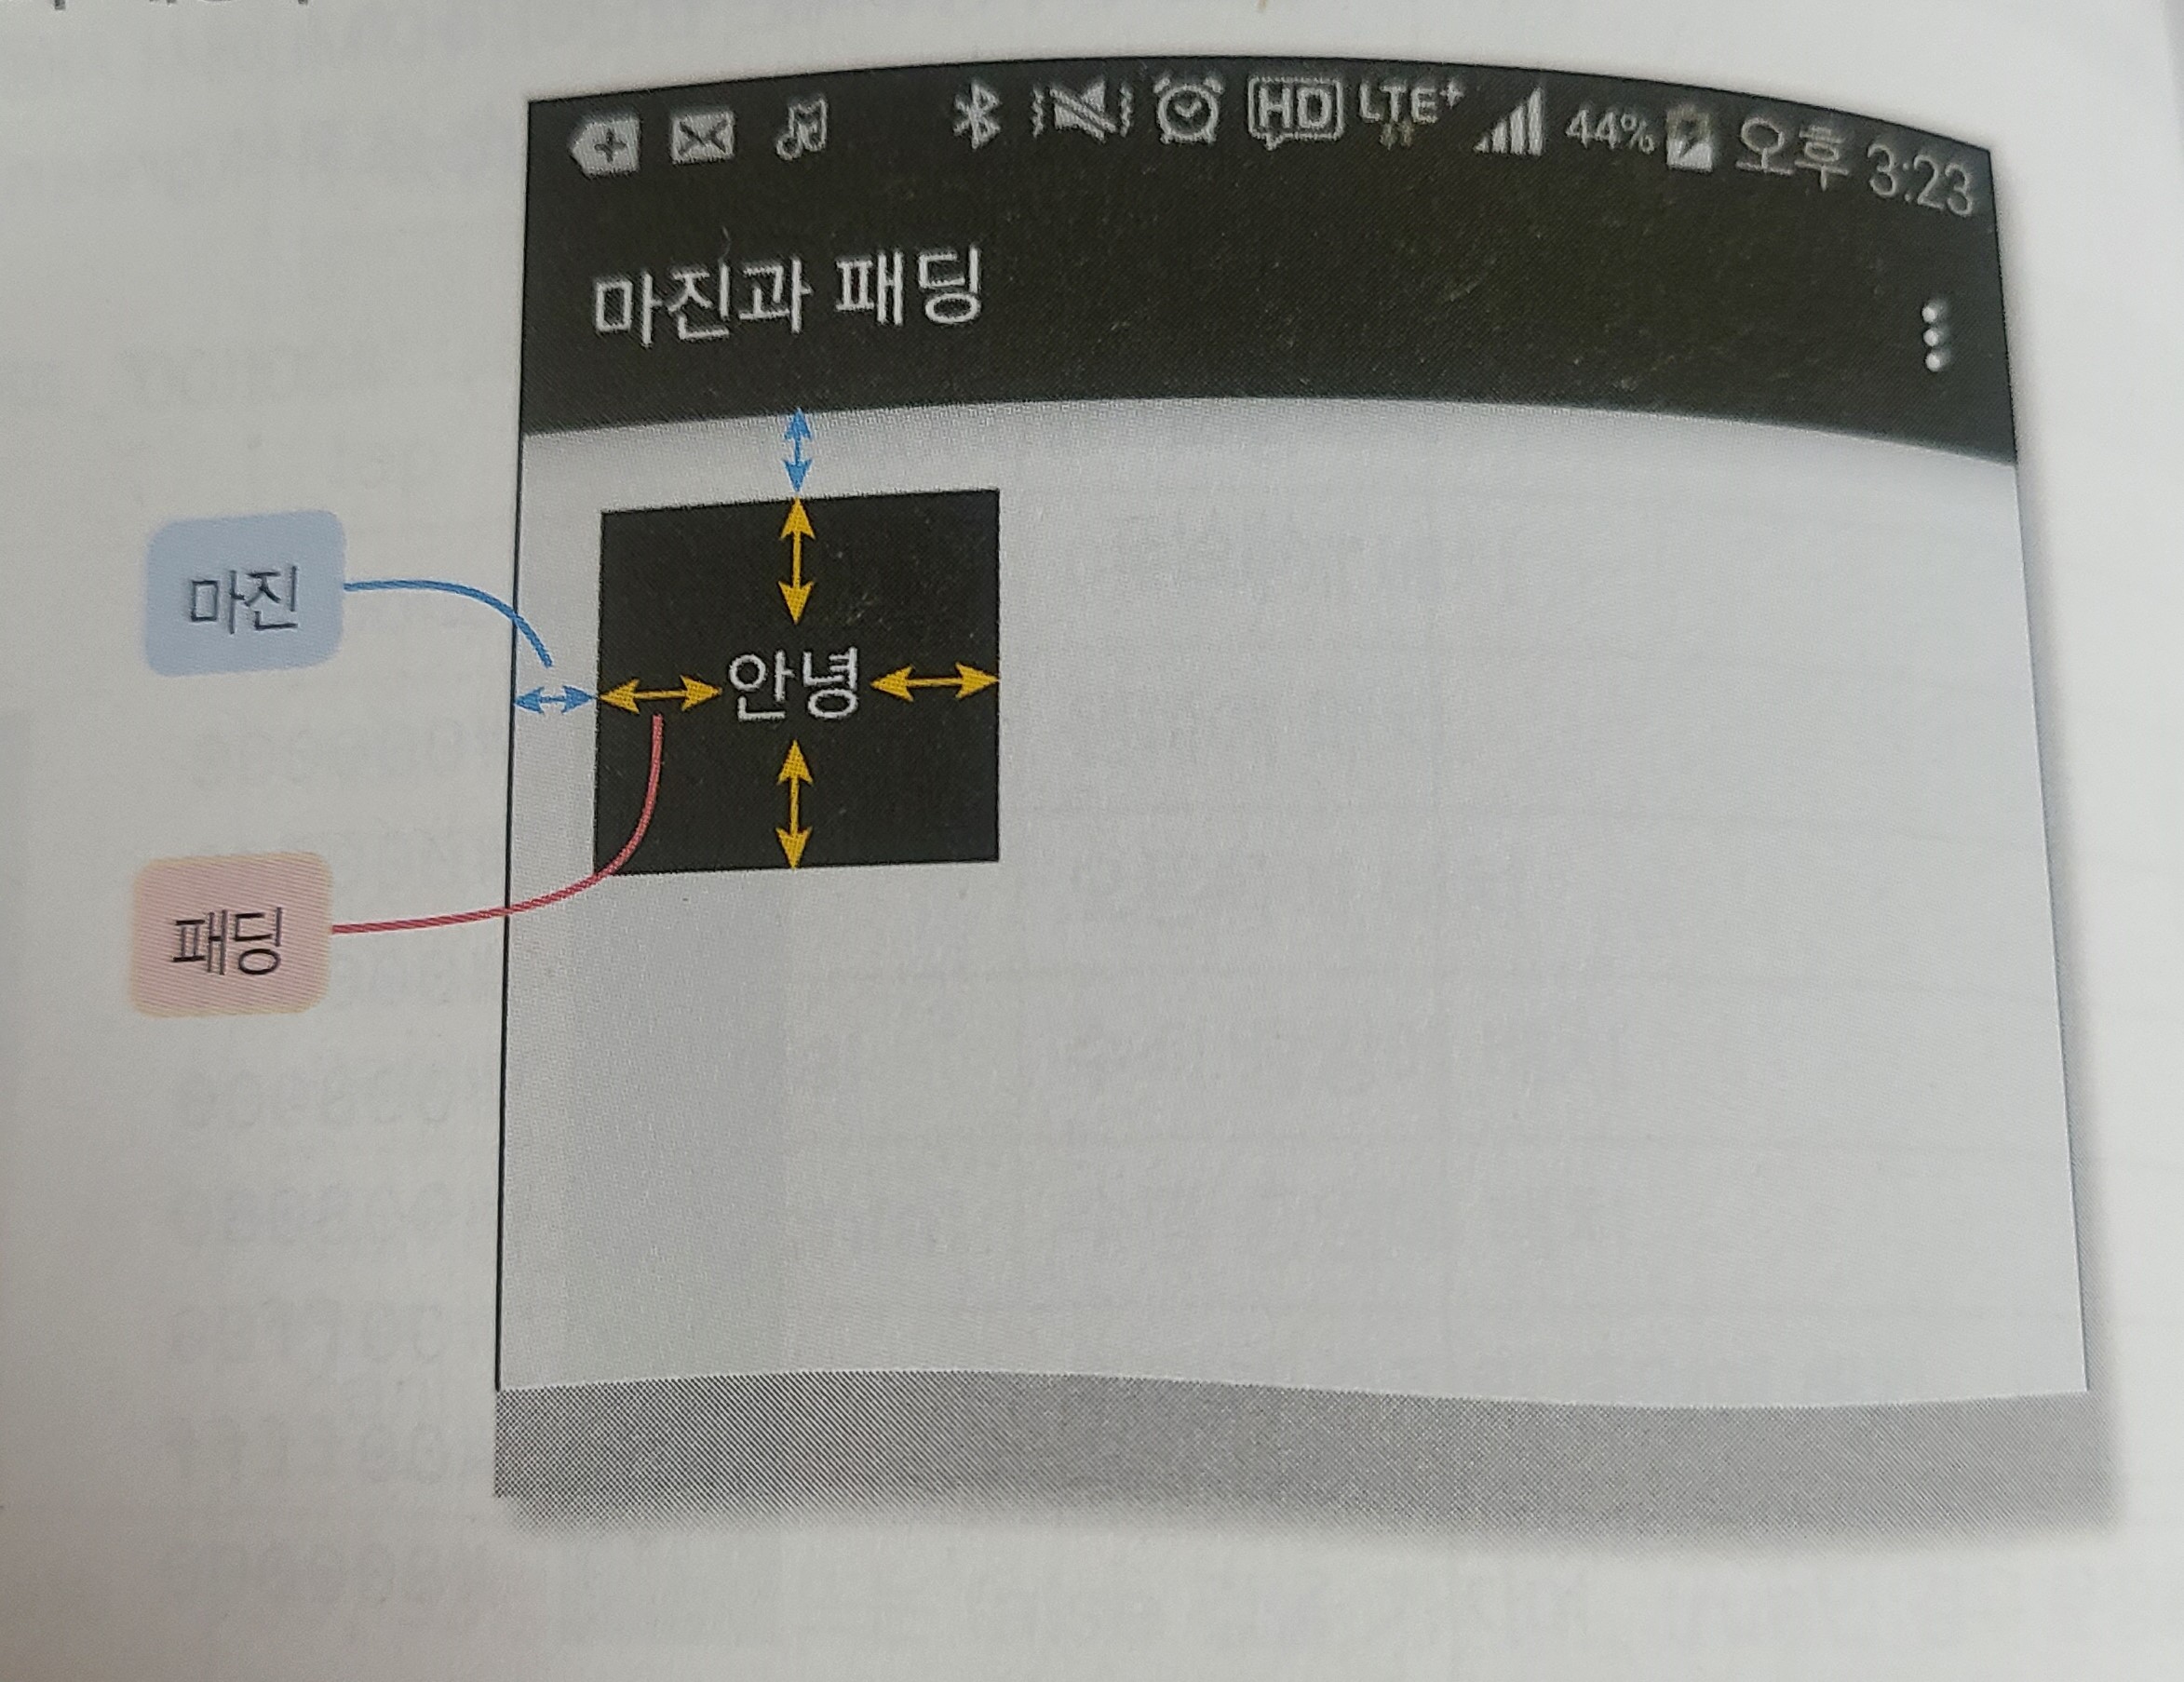
android:background
뷰의 배경색, 배경 이미지, xml 파일을 지정
형식 "#rrggbb"
빨간색 :"#ff0000"
초록색 : "#00ff00"
파란색 : "#0000ff"
흰색 : "#ffffff"
검정색 : "#000000"
투명도는 앞에 aa를 붙이면 완전 투명
앞에 ff를 붙이면 완전 불투명
2. 화면 출력
화면 출력 방법은 두 가지가 있다.
1. XML 문서 EX) activity_main.xml 에서 뷰들을 배치하고
액티비티 자바 클래스에서 그 문서를 불러 출력
2. 액티비티 자바 클래스에서 동적으로 뷰 객체를 생성하여 출력
엘리먼트 이름은 자바 클래스 속성명과 같고
속성들의 값은 자바 클래스의 메소드에서 수정
XML 문서의 속성
xmlns:android="http://schemas.android.com/apk/res/android"
앱을 실행하면 AndroidManifest.xml에서
메인 액티비티 자바 클래스로 설정된
MainActivity.java가 실행됨
package com.example.poem;

import androidx.appcompat.app.AppCompatActivity;
// 문자열을 다양한 형태의 메시지를 담는 컨테이너로 매핑
import android.os.Bundle;

public class MainActivity extends AppCompatActivity {
    //MainActivity 클래스가 AppCompatActivity를 부모 클래스로 정의

    @Override
    protected void onCreate(Bundle savedInstanceState) {
        super.onCreate(savedInstanceState);  // 액티비티 생성
        // 메소드 충돌 방지를 위해 super 사용
        setContentView(R.layout.activity_main);  // 화면(레이아웃) 출력
    }
}
4. 환경 설정
AndroidManifest.xml
<?xml version="1.0" encoding="utf-8"?>
<manifest xmlns:android="http://schemas.android.com/apk/res/android"
    xmlns:tools="http://schemas.android.com/tools">

    <application
        android:allowBackup="true"
        android:dataExtractionRules="@xml/data_extraction_rules"
        android:fullBackupContent="@xml/backup_rules"
        android:icon="@mipmap/ic_launcher"
        android:label="@string/app_name"
        android:supportsRtl="true"
        android:theme="@style/Theme.Poem"
        tools:targetApi="31">
        <activity
            android:name=".MainActivity"
            android:exported="true">
            <intent-filter>
                <action android:name="android.intent.action.MAIN" />

                <category android:name="android.intent.category.LAUNCHER" />
            </intent-filter>
        </activity>
    </application>

</manifest>'안드로이드 프로그래밍' 카테고리의 다른 글
| 갤러리 (0) | 2023.03.13 |
|---|---|
| 이미지 출력 (0) | 2023.03.13 |
| 3장 앱 프로젝트 구조와 실행 원리 (0) | 2023.03.10 |
| 텍스트의 활용 (0) | 2023.02.07 |
| 2장 앱 환경 구축 (0) | 2023.02.04 |
